Making a Web Extension in Minutes
13/04/2022 • 7 min read
Outline of a Simple Web Extension
An extension generally has 4 types of scripts:
- Background
- The worker script, runs on its own context
- Popup
- That button on the top right
- Options
- Configuration page of the extension where you open it up by right clicking the popup button.
- Content Scripts
- These scripts get injected to the pages that you want. Usually those are the scripts when you imagine of extensions.
Media Saver Extension
We are going to learn with an example chromium project. When you right click on the page on any media, link or even the page itself, it will save the date and the URL to the browser storage. Then you will be able to export it to a JSON.
Repository: github.com/BerkeKaragoz/Media-Saver-WebExt
Before continuing, you can skim over the Getting Started sample of Chrome Docs.

Make sure to refresh the extension from here everytime you make an update and want to see it.
Manifest File
Making a web extension starts with creating a manifest file. The manifest file is the entry point for your extension. It is a JSON file that contains information about:
- Extension information (name, description, version and etc.)
- Permissions
- Script entry points (background, popup, options and content scripts)
- Icons
The current manifest file version is 3. And version 2 is getting deprecated.

Lets set it up, the paths are relative to the file:
// manifest.json
{
  "name": "Media Saver",
  "description": "Save any media source!",
  "version": "0.0",
  "manifest_version": 3,
  "icons": {
    "16": "/images/icon-16.png",
    "32": "/images/icon-32.png",
    "48": "/images/icon-48.png",
    "128": "/images/icon-128.png"
    },
  "permissions": []
}
Add your icons to the /images directory and load the unpacked extension to your browser as shown here.
I am totally professional at using paint so here are the icons I drew.
Background Script
Create the background.js near the manifest file and add its entry to the manifest file:
// manifest.json
...,
"background": {
  "service_worker": "background.js"
},
Now we add what we want the extension to do when it is installed:
chrome.runtime.onInstalled.addListener(() => {
   // Bla bla...
})
chrome is the namescape for the browser and it's API's, and we are using the runtime API.
Context Menu
Now we want to add a button to the menu that comes up when you right click on a page.
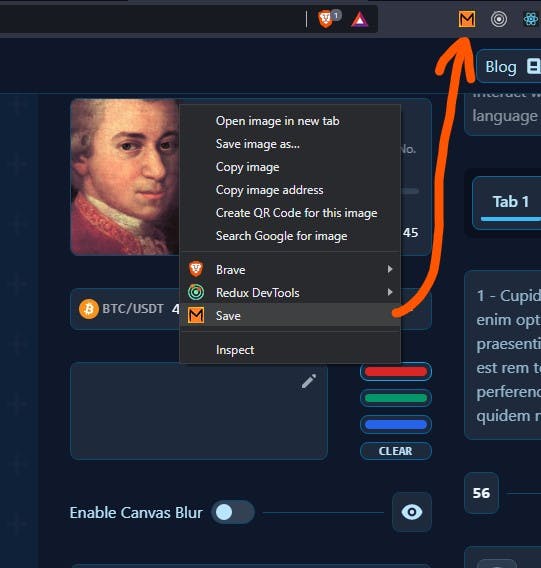
First we will have to create the menu.
// background.js
//chrome.runtime.onInstalled.addListener(() => {
chrome.contextMenus.create({
   title: "Save",
   id: "save",
   contexts: ["image", "video", "link", "audio", "selection", "page"], // ex: if you right click on an image, the button will show up
})
//});
Now we have created it, but this API requires a permission:
// manifest.json
...,
"permissions": ["contextMenus"],
Missing a permission can be hard to debug, so keep that in mind.
Now, the way the context menus work, isn't like appending a button to a list. We add the onclick handler to the whole context menus. When the menu item is clicked, it fires an event like below:
{
   "editable": false,
   "frameId": 0,
   "menuItemId": "save",
   "pageUrl": "https://berkekaragoz.com/"
}
This event object would change if the menu was opened by right clicking on an image, or any other context.
Therefore the only way to determine which button that is pressed is by menuItemId.
Adding an Event Handler
Now we add our onclick handler. To note that we don't add it inside the onInstalled event:
// background.js
chrome.contextMenus.onClicked.addListener((event) => {
   switch (event.menuItemId) {
      case "save":
         //saveMedia(event); // the function that we want to run
         break
      default:
         console.error("Unknown menuItemId: ", event)
         chrome.notifications.create("unknown_menuItemId", {
            type: "basic",
            iconUrl: "/images/icon-48.png",
            title: "Failed",
            message: JSON.stringify(event),
         })
   }
})
Now note that we just created a notifiaction if the menuItemId doesn't match our records. This also requires permission notifications. And this is a desktop notification.
Storage
Lets actually make the function that parses saves whatever we want.
//background.js
const saveMedia = (event) => {
   const {
      mediaType = "",
      // these change depending on where the menu was opened (context)
      pageUrl,
      srcUrl,
      linkUrl,
   } = event

   const media = {
      url: null,
      mediaType,
      date: new Date().toISOString(),
   }

   if (srcUrl) {
      media.url = srcUrl
   } else if (linkUrl) {
      media.url = linkUrl
      media.mediaType = "link"
   } else if (pageUrl) {
      media.url = pageUrl
      media.mediaType = "page"
   }

   // we gave the key, and the callback function the fetch our data from storage
   chrome.storage.sync.get("savedMedia", ({ savedMedia }) => {
      const appendedMedia = Array.isArray(savedMedia) // because it may be empty etc.
         ? [...savedMedia, media]
         : [media]

      chrome.storage.sync.set({ savedMedia: appendedMedia }) // save the appended data
   })
}
Since we are using the storage API, we also need to add storage to permissions on manifest.json.
Popup
Okay now that we can save, the next step is to show or export what we saved. Lets show those on the popup when you click the extension button.
I am not going to explain the whole process but the outline of it. We simply create the files for a normal web page: HTML, CSS, JS files.
popup/
    popup.css
    popup.html
    popup.js
Now we have to set the entry point and the icons for the popup on manifest.json:
// manifest.json
...,
"action": {
  "default_popup": "popup/popup.html",
  "default_icon": {
    "16": "/images/icon-16.png",
    "32": "/images/icon-32.png",
    "48": "/images/icon-48.png",
    "128": "/images/icon-128.png"
  }
},
We setup our HTML file and import our CSS and JS files, add two buttons for exporting and clearing the saved data, and a table to show what we saved. Here is the link to code of the popup for this example.
Content Scripts
As I said, these scripts get injected to the open pages in the browser. Becareful to reload the pages after the changes to inject the code again.
For this extension, we want to show a toast when we save a media to show what we saved. This will run in the context of each page.

Lets create the toast component:
content_scripts/
              toast/
                    toast.css
                    toast.js
And add the entries to the manifest.json:
// manifest.json
...,
"content_scripts": [
  {
    "matches": ["<all_urls>"],
    "js": ["content_scripts/toast/toast.js"],
    "css": ["content_scripts/toast/toast.css"],
    "match_about_blank": true,
    "match_origin_as_fallback": true
  }
],
The matches key determines on which pages the script gets injected. The way matching works is explained here.
Since we are not injecting an HTML page, we have to inject JS and CSS explicitly.
Messaging
When we save something, we have to send a message to the script. We cannot simply call a function from this script in background.js because they exist on different contexts. We have to send messages.
We will send a simple one-time request.
// background.js
//const saveMedia = (event) => {...
// chrome.storage.sync.get("savedMedia", ({ savedMedia }) => {
//  ...
chrome.tabs.query({ active: true, currentWindow: true }, (tabs) => {
   chrome.tabs.sendMessage(tabs[0].id, media, () => {}) //tabId, data, callback
})
// });
//}
We are using the Tabs API to send messages, however we won't add tabs permission to the manifest file. We will add activeTab since we are using only the active tab, hence { active: true, currentWindow: true }.
The message gets queried with the sendMessage function.
And we add onMessage event handler in toast.js:
// toast.js
//...
chrome.runtime.onMessage.addListener((request, sender, sendResponse) => {
   const { mediaType, url, date } = request
   if (!mediaType) return

   toastTitleEl.textContent = `${capitalizeFirstLetter(mediaType)} saved!`
   toastMessageEl.innerHTML = `<a href="${url}" target="_blank" referrer="no-referrer">${url}</a>`

   toastEl.classList.add("show")

   setTimeout(() => {
      toastEl.classList.remove("show")
   }, 3000)

   sendResponse()
})
Rest of the toast component code is here.
Options
We don't have any options for this sample, but if we wanted to do some customization. Like changing the colors of the buttons. We would make the HTML page to select colors, then save the colors to the storage. Later, initialize the colors by getting them from the storage.
// manifest.json
...,
"options_page": "options/options.html"
The Getting started sample does exactly this.
Final
Now we have a full working web extension. We can save anything, export them, and parse the JSON data for whatever we want.
We did this application with vanilla JavaScript. There wasn't any code bundling etc. We could add hot module reloading, Vue, SASS and more. That way we would have a better developer experience. We could even make this extension unified to be compatible with Firefox by using the right setup and libraries.
You currently know the fundamentals of developing a web extension. Now you can be creative and look up many other things that you can do. Hope you are happy with it!
"Making a Web Extension in Minutes", 13/04/2022, 13:44:00